So we did a big review day of everything we had learned about color.
I realized a better was to describe Tertiary colors are to mix a primary and secondary color. I still look at which primary color it is closer to so I know which primary I should add 2 of. I am more of a visual and interactive learner.
Tonight we will be going over color map formulations more in depth and working with color swatches. I'm excited because I LOVE color.
Showing posts with label about school. Show all posts
Showing posts with label about school. Show all posts
Tuesday, July 16, 2013

Sunday, July 14, 2013
Paul Mitchell KITMAS
Ok so I promised these pictures awhile back so here they are: (the 3 Milady books are not shown below because I leave them in my locker so I don't have to lug them around)


Day 10 Paul Mitchell (Color Wheel, ABCDs of Color, color map formulations)
For us this ended up being our Bring a Friend day. YEA!!!
Agenda:
PlayDoh colorwheel
ABCDs of Color
Color Map Formulations
True Law: Without light there is no color
Metamerism: The Play on Light
Have you ever noticed when you go different places your hair or makeup looks different? Well that can be due to the lighting.
Incandescent Light: warm tones
Fluorescent Light: cool tones
Best and most accurate light: sun, natural light
PLAYDOH COLORWHEEL:
We were given a blank colorwheel that we filled in with playdoh. Loved it!
Primary Colors
Red, Yellow, Blue
Secondary Colors
1/2 and 1/2 of 2 primary colors (1/2 blue and 1/2 red make purple, 1/2 yellow and 1/2 red make orange, 1/2 yellow and 1/2 blue make green)
Tertiary Colors
1/3 and 2/3 of 2 primary colors (mix 3 even sized playdoh balls together, 2 being one primary color and 1 being another primary color)
Let me say that doing it this way made SOOO much more sense to me than when I've been handed a colorwheel before.
Here is mine:

Sorry for the white pieces on some of the color patches, it stuck to one of my notebook pages.
The 4 extra patches by violet (I was told not to call it purple because people do not want to hear you are putting purple in their hair, violet sounds better), are adding more white each time and see how it lightens.
With Brown
to get golden you add yellow
to get warm you add red
to get ash you add small amount of blue (blue is very potent in coloring)
ABCD's of Color:
Ammonia: volatile, inorganic substance (STRONG ODOR), used to open cuticle
Base: Viscous product that binds, holds everything together
Color Pigment: 1. Oxidative 2. Direct
Developer (or H2O2): Energy, create lift or deposit, energy releases more or less oxygen, decolorize melanin
Lift: taking color out
Deposit: putting color in
Color Map Formulation:
We went over the formulations steps, gray coverage, formulating with the Paul Mitchell the color map and processing color. I am excited to get into coloring!
Agenda:
PlayDoh colorwheel
ABCDs of Color
Color Map Formulations
True Law: Without light there is no color
Metamerism: The Play on Light
Have you ever noticed when you go different places your hair or makeup looks different? Well that can be due to the lighting.
Incandescent Light: warm tones
Fluorescent Light: cool tones
Best and most accurate light: sun, natural light
PLAYDOH COLORWHEEL:
We were given a blank colorwheel that we filled in with playdoh. Loved it!
Primary Colors
Red, Yellow, Blue
Secondary Colors
1/2 and 1/2 of 2 primary colors (1/2 blue and 1/2 red make purple, 1/2 yellow and 1/2 red make orange, 1/2 yellow and 1/2 blue make green)
Tertiary Colors
1/3 and 2/3 of 2 primary colors (mix 3 even sized playdoh balls together, 2 being one primary color and 1 being another primary color)
Let me say that doing it this way made SOOO much more sense to me than when I've been handed a colorwheel before.
Here is mine:

Sorry for the white pieces on some of the color patches, it stuck to one of my notebook pages.
The 4 extra patches by violet (I was told not to call it purple because people do not want to hear you are putting purple in their hair, violet sounds better), are adding more white each time and see how it lightens.
With Brown
to get golden you add yellow
to get warm you add red
to get ash you add small amount of blue (blue is very potent in coloring)
ABCD's of Color:
Ammonia: volatile, inorganic substance (STRONG ODOR), used to open cuticle
Base: Viscous product that binds, holds everything together
Color Pigment: 1. Oxidative 2. Direct
Developer (or H2O2): Energy, create lift or deposit, energy releases more or less oxygen, decolorize melanin
Lift: taking color out
Deposit: putting color in
Color Map Formulation:
We went over the formulations steps, gray coverage, formulating with the Paul Mitchell the color map and processing color. I am excited to get into coloring!
Day 9 Paul Mitchell (guest service, character awards, review)
Agenda:
It is extremely important to remember wherever you are working you are not only representing yourself but your employers when you help others.
GUEST SERVICE:
Going over guest service we covered everything from what we do when the guest arrives, hair history, to recommending product for their hair.
I learned that we have to get 3 signatures from one of our instructors before our service is completely finished. I actually like that so I will be getting feedback and education throughout being out on the floor later.
We covered the 10 Opportunities and 2 minute plan. Also the Check Five and 4-Step Program.
The Check Five was my favorite part because it leads to success for you if you follow it.
Check Five:
Hearing
is what I'm saying professional and appropriate?
Sight
am I in dress code? Is my area clean and neat?
Touch
is my guest comfortable?
Smell
Light perfume, deodorant
Taste
can I taste my lunch? MINTS!!!
Character Awards:
We each drew a name of another person in our program to which we would be presenting an award to. This is not to be about skill or talent, but all about their character and personality. I am going to keep thinking of what I can do for the person I drew.
We ended class by reviewing the concepts we've learned thus far.
- Guest Service
- Character Awards
- Review Culture and Wet Styling
It is extremely important to remember wherever you are working you are not only representing yourself but your employers when you help others.
GUEST SERVICE:
Going over guest service we covered everything from what we do when the guest arrives, hair history, to recommending product for their hair.
I learned that we have to get 3 signatures from one of our instructors before our service is completely finished. I actually like that so I will be getting feedback and education throughout being out on the floor later.
We covered the 10 Opportunities and 2 minute plan. Also the Check Five and 4-Step Program.
The Check Five was my favorite part because it leads to success for you if you follow it.
Check Five:
Hearing
is what I'm saying professional and appropriate?
Sight
am I in dress code? Is my area clean and neat?
Touch
is my guest comfortable?
Smell
Light perfume, deodorant
Taste
can I taste my lunch? MINTS!!!
Character Awards:
We each drew a name of another person in our program to which we would be presenting an award to. This is not to be about skill or talent, but all about their character and personality. I am going to keep thinking of what I can do for the person I drew.
We ended class by reviewing the concepts we've learned thus far.
Day 8 Paul Mitchell (backcombing, hair structure, look book)
Sorry I know I am behind on my postings. It has been a little crazy around here.
Agenda:

 She's gorgeous eh? hehe. Well I liked backcombing and found it fun. The hard part for me was then deciding on the style. I tried this but it didn't turn out like I wanted:


I had seen this style on Pinterest here:

As you can see, I need to work on it.
Hairstructure:
Our instructor gave us some hand outs of hair structure diagram to where it broke the hair shaft down.
Your hair has 3 main parts; the cuticle, the cortex and the medulla.
Something I found very interesting is that even though the cuticle is the outermost layer of the hair, it's the cortex where you find your hair color.
Our instructor did a small interactive presentation to where she would use serane wrap around our arm (we would take turns so she just wrapped one arm for each demonstration) to simulate the cuticle.

For fine hair, she would wrap our arm 4 times.
For medium hair' she would wrap our arm 7 times and then add on to make it 12 layers.
For thick hair, she would wrap our arm 18 times.
After each wrapping, it would be slid off the arm so we could feel the thickness. Since I'm a hands-on person it really helped cement what the cuticle was like.
Chemical Makeup of Hair:
Proteins: 65-95% Amino Acids
Water: up to 32% moisture
Carbs: flexibility
Lipids: defense, shine
Pigment: color makes up only 1%
Minerals: strength
Found this diagram that is similar to the one we received to fill out:

LOOK BOOK:
Agenda:
- Backcombing
- Hairstructure
- Look Book


I had seen this style on Pinterest here:

As you can see, I need to work on it.
Hairstructure:
Our instructor gave us some hand outs of hair structure diagram to where it broke the hair shaft down.
Your hair has 3 main parts; the cuticle, the cortex and the medulla.
Something I found very interesting is that even though the cuticle is the outermost layer of the hair, it's the cortex where you find your hair color.
Our instructor did a small interactive presentation to where she would use serane wrap around our arm (we would take turns so she just wrapped one arm for each demonstration) to simulate the cuticle.
For fine hair, she would wrap our arm 4 times.
For medium hair' she would wrap our arm 7 times and then add on to make it 12 layers.
For thick hair, she would wrap our arm 18 times.
After each wrapping, it would be slid off the arm so we could feel the thickness. Since I'm a hands-on person it really helped cement what the cuticle was like.
Chemical Makeup of Hair:
Proteins: 65-95% Amino Acids
Water: up to 32% moisture
Carbs: flexibility
Lipids: defense, shine
Pigment: color makes up only 1%
Minerals: strength
Found this diagram that is similar to the one we received to fill out:
LOOK BOOK:

We were instructed that we would be making a Look Book as we are going through school. This will illustrate what we can do, would like to do, or possibilities. That way when we graduate and look for a job, we can show them this book so they can see what we are capable of. I really like the idea.
Wednesday, July 10, 2013
Day 7 Paul Mitchell (roller placement)
ROLLER PLACEMENT
This is a lot like doing pincurls in regards to base, stem and curl/circle. The advantage to doing rollers over pin curls are:
Volume-base curls
Your base: (can be shaped in rectangle, square, or triangle)
should be same width and length of roller
Stem:
part of hair that starts to come up over the roller from the scalp
Curl or circle:
the roller determines size of wave or curl
We were also instructed on the various degrees in which to pull the hair to create more volume if desired. For instance if you were curling the hair forward you would comb the hair back at a 45 degree angle and pin on base.
SECTIONING
Our instructor taught us how to section off the hair and do little top knots (she had another name for them but I cannot remember).


There end up being a total of 9 sections: 3 down the middle and 3 on each side.
From there we rolled the front middle (above forehead) section on back (like a mohawk). We then rolled the side middle, then the bottom portion and finished with the front section by the face.


We get to unroll them tomorrow to see how they turned out. I am excited!
This is a lot like doing pincurls in regards to base, stem and curl/circle. The advantage to doing rollers over pin curls are:
- Ability to use more hair (faster than pin curling)
- Can create more tension (tighter curls)
- Variety (shapes, sizes, texture of roller- basically anything you can wrap your hair around)
Volume-base curls
- on base
- used to get lift/volume
- bring curl farther back on base when placing (slightly overdirected)
- on base
- good for volume but not as high as volume-base curls
- good for cow-licks or growth patterns
- stem is half on
- not as much volume
- produces flat then curl look
- medium volume
- great on longer hair
- curl is off base
- produces curl at ends look
Your base: (can be shaped in rectangle, square, or triangle)
should be same width and length of roller
Stem:
part of hair that starts to come up over the roller from the scalp
Curl or circle:
the roller determines size of wave or curl
We were also instructed on the various degrees in which to pull the hair to create more volume if desired. For instance if you were curling the hair forward you would comb the hair back at a 45 degree angle and pin on base.
SECTIONING
Our instructor taught us how to section off the hair and do little top knots (she had another name for them but I cannot remember).


There end up being a total of 9 sections: 3 down the middle and 3 on each side.

From there we rolled the front middle (above forehead) section on back (like a mohawk). We then rolled the side middle, then the bottom portion and finished with the front section by the face.


We get to unroll them tomorrow to see how they turned out. I am excited!

Tuesday, July 9, 2013
Day 6 Shot in the Arm
So last evening at school we did "Shot in the arm". I have been sworn to secrecy and do not want to ruin this occasion for any future students. Just know this does not involve needles or getting hit. I do want to say that so that you're not scared.
It was a fun learning experience. Tonight I am to bring my doll head and kit so I'm excited as to what we are going to be learning. I really did miss being at school and writing these recaps.
It was a fun learning experience. Tonight I am to bring my doll head and kit so I'm excited as to what we are going to be learning. I really did miss being at school and writing these recaps.
Saturday, June 29, 2013
No School Paul Mitchell

I will not be doing posts on my Paul Mitchell experience in school this next week due to being on break. I know it's sad that we just started and have only been there a week to now have a break. I am looking forward to reading our book we have by Winn Claybough, "Be Nice (Or Else)".
Also I will be working in our Paul Mitchell Product Guide Workbook. This next week I will post the pictures of everything we received in our kit.
Day 5 Paul Mitchell (take home team, Pin curls, fingerwaves)
Take Home Team
Pin curls with hands on
Fingerwaves with hands on
Last night the "Take-Home" Team came in and talked to us. They talked to use about the Paul Mitchell products and had us smell each one. Most all of them have a nice smell to them which is a bonus. We watched a video clip on what diversion is and what we can do to help. I looked up on Google and Youtube to try to find the clip but I was unable to. It was about diversion on Fox 8 news with Steve Noviello about professional haircare products on the shelves at places like Target, CVS, etc. They bought some Paul Mitchell products from these stores and then had the official Paul Mitchell products. Fox 8 news took the products to a lab and had them tested. The person who performed the test put 1 of each in a petri dish. The official Paul Mitchell product grew zero colonies of bacteria whereas the Paul Mitchell product bought at the store grew numerous colonies of bacteria. In the clip they even compared shelf bought Paul Mitchell to that of sewage. The bottles look almost identical but 2 ways you can tell the Paul Mitchell on the shelves is counterfeit is the cap. On official Paul Mitchell bottles there is a single snap whereas on counterfeits there are 2 snaps. Also if you compare the bottoms, real Paul Mitchell bottles are seamless, the counterfeits have a seam that you can see and can sometimes bow the bottom of the bottle.
With price it is generally more expensive to buy from non-salon stores versus salons. Paul Mitchell even said in the clip that he could sell to regular stores and make a lot of money if he wanted to but that goes against his principles. Buying from a salon you know you are getting the real product, not some counterfeit, diluted, old, or fake product. So if you have bought salon products from off regular store shelves and they really haven't worked, you should try getting that same product from an actual salon and see if there is a difference.
Pincurls:
These were actually fun to learn. You want to do these on wet hair so they can dry in the curl.
We learned about the base, the stem and the circle of pin curls.
We were also taught the foundations and bases and where to use each.
- Rectangle
- Triangle
- Ark or Half Moon
- Square
- No stem (or on-base)
- Half-stem
- Full stem


I will say the front row we forgot to add product which you can see fell over more than the ones farther back but that could also be because of the weight of the hair and the size of the curls.
FINGERWAVES:
These are the bane of my existence. I am going to continue to practice this and hope I get the knack of it.
Need a fair amount of product. We used Paul Mitchell's Hair Sculpting Lotion and Foaming Palmade.
#1 THINK
- How do I want them to look when I'm done?
- How am I going to get them to look like that?
- What tool am I going to use?
- On the Heavy side of the Part
- Going forward from the Hairline to the Apex
- ALL THE WAY AROUND THE HEAD
Slightly moving comb in direction needed
Clamp ridge between fingers
Comb down below fingers
I did not take a picture of my fingerwaves because I did not like the look of it at all! Below is a picture I found to illustrate what good fingerwaves look like, that I hope one day to replicate.

That was our evening. Also let me say it is difficult to wash hair on a head that doesn't have a body attached, haha.
Friday, June 28, 2013
Day 4 Paul Mitchell (braiding, french twist)
First off, I LOVED last nights class. It was terrific and I love braids!! I really have only done different things with french braiding but I got to learn other types of braids.
Agenda:
Braiding
French Twist
The types of braids we learn are listed below. With most of them it was my first time.
ANGEL BRAID
(an angel braid is like a regular french braid but you only grab hair to add in from one side. Whatever side you are wanting the braid to pay, that's the side you pick up from. You don't have to do the full head, I just started turning around the crown and didn't want to finish so I turned it and went back around)


ROPE BRAID
(this is typically a braid to help fill or use as a head band. You use 4 strands of hair with this)


FRENCH BRAID
(I left in the rope braid from above and added the french braid)


CORN ROWS
(now after this class I learned that I had been doing corn rows wrong for years! I wouldn't do the inverted braids like you're suppose to and so this was tough for me. I'm still trying to master the inverted braid)

INVERTED BRAID
(like a regular braid except inside of going over you go under with the hair pieces)
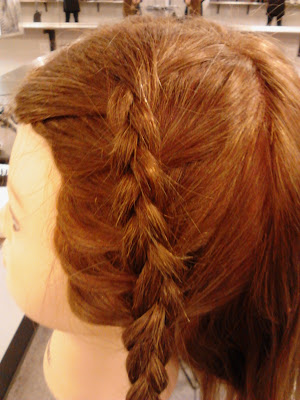
BAMBOO BRAID
(this is my favorite braid to do! You have 3 strands but only 1 of them is the one you really move. Our instructor say it's like basket weaving. I need to work on making this braid looser as well. This one is very tight. Bamboo braids are used mostly for fill ins)

We also did FISHTAIL BRAID but when I tried to loosen up the strands to give it a fuller look it completely messed it up so I didn't get a picture.
FRENCH TWIST
(needs longer hair to have a nice look)

CLASSIC FRENCH TWIST
(this twist can be done on shorter hair than the French Twist above)


Again I will say I loved class and it really flew by.
Agenda:
Braiding
French Twist
The types of braids we learn are listed below. With most of them it was my first time.
ANGEL BRAID
(an angel braid is like a regular french braid but you only grab hair to add in from one side. Whatever side you are wanting the braid to pay, that's the side you pick up from. You don't have to do the full head, I just started turning around the crown and didn't want to finish so I turned it and went back around)


ROPE BRAID
(this is typically a braid to help fill or use as a head band. You use 4 strands of hair with this)


FRENCH BRAID
(I left in the rope braid from above and added the french braid)


CORN ROWS
(now after this class I learned that I had been doing corn rows wrong for years! I wouldn't do the inverted braids like you're suppose to and so this was tough for me. I'm still trying to master the inverted braid)

INVERTED BRAID
(like a regular braid except inside of going over you go under with the hair pieces)

BAMBOO BRAID
(this is my favorite braid to do! You have 3 strands but only 1 of them is the one you really move. Our instructor say it's like basket weaving. I need to work on making this braid looser as well. This one is very tight. Bamboo braids are used mostly for fill ins)

We also did FISHTAIL BRAID but when I tried to loosen up the strands to give it a fuller look it completely messed it up so I didn't get a picture.
FRENCH TWIST

CLASSIC FRENCH TWIST
(this twist can be done on shorter hair than the French Twist above)


Again I will say I loved class and it really flew by.
Thursday, June 27, 2013
Day 3 Paul Mitchell (sanitation, draping, 5 minute mini)
First off let me say this was an awesome class!
Agenda:
Sanitation
Draping and Hands On
5 Minute Mini and hands on
We started our class by watching a short clip by Anjelah Johnson:
It's interesting that you don't have to wash your hands BEFORE you get your nails done but after. I'm sure I will find out why when we go through doing nails.
I didn't know Barbicide came concentrated to where you have to dilute with water (doesn't matter if it's warm or cold water). Then it will last no longer than 3 days or when you start to see little floaties.
For brushes that you cannot use Barbicide on you are able to use 99% alcohol (which you can find at Sallys). For shears and clippers you can use Clippercide which our instructor said is amazing! When giving a service you always want to use a neck strip to protect them.
I can say I have been to many salons that do not use neck strips and now I am thoroughly grossed out. Definitely going to be using neck strips always!
Draping:
3 different types of drapes
Thermal Drape:
Already shampooed, needing a head of curls or updo
Use light fabric drape
Single Drape:
Use for cutting, shampooing, and blow style
Can use either the light fabric drape or the rubberized drape.
Over the neck strip you wrap the neck with a towel
Double Drape:
Use for ANY chemical service
Same as single drape but then you add another towel around the neck over the drape (enables you to swap if it gets wet)
We then had a "drape rodeo" to where we had teams that went through 3 times. Our instructor held up signs for each drape we were to put on our "client" (which was another student). First team done won. It was fun and helped reinforce what we had just learned.
We were then taught how to perform the 5 minute mini. LOVE THIS!!
Before every haircut
I was also glad that I was second on the 5 minute mini because I was able to fully relax. My favorite part of getting anything done with my hair is the scalp massage and neck massage. It's wonderful!
That was our evening class. I love my school! For day 4 we were asked to bring in one of our doll heads, doll head stand, and our kit. Excited!
Agenda:
Sanitation
Draping and Hands On
5 Minute Mini and hands on
We started our class by watching a short clip by Anjelah Johnson:
It's interesting that you don't have to wash your hands BEFORE you get your nails done but after. I'm sure I will find out why when we go through doing nails.
I didn't know Barbicide came concentrated to where you have to dilute with water (doesn't matter if it's warm or cold water). Then it will last no longer than 3 days or when you start to see little floaties.
For brushes that you cannot use Barbicide on you are able to use 99% alcohol (which you can find at Sallys). For shears and clippers you can use Clippercide which our instructor said is amazing! When giving a service you always want to use a neck strip to protect them.
I can say I have been to many salons that do not use neck strips and now I am thoroughly grossed out. Definitely going to be using neck strips always!
Draping:
3 different types of drapes
Thermal Drape:
Already shampooed, needing a head of curls or updo
Use light fabric drape
Single Drape:
Use for cutting, shampooing, and blow style
Can use either the light fabric drape or the rubberized drape.
Over the neck strip you wrap the neck with a towel
Double Drape:
Use for ANY chemical service
Same as single drape but then you add another towel around the neck over the drape (enables you to swap if it gets wet)
We then had a "drape rodeo" to where we had teams that went through 3 times. Our instructor held up signs for each drape we were to put on our "client" (which was another student). First team done won. It was fun and helped reinforce what we had just learned.
We were then taught how to perform the 5 minute mini. LOVE THIS!!
Before every haircut
- 3 dots of Tea Tree Oil on frontal bone, apex, and nape
- 1 dot on each finger
- Soothing massage for 5 minutes
- Slow motions- really feeling the shape of the guests head
- No talking, let them relax
I was also glad that I was second on the 5 minute mini because I was able to fully relax. My favorite part of getting anything done with my hair is the scalp massage and neck massage. It's wonderful!
That was our evening class. I love my school! For day 4 we were asked to bring in one of our doll heads, doll head stand, and our kit. Excited!
Wednesday, June 26, 2013
Day 2 Paul Mitchell (plugged in, forward forcus, learning journey, non-linear notetaking, general hair and cranium)
Agenda:
We also took a Multiple Intelligence Questionnaire (micubed.com) that was able to identify your type of learning. There are 7 Intelligences that this is based off of. I found it a really interesting quiz to where you answered questions and also identified which stick figure you identified with. From the results it hit me spot on with my learning type. "It's not how smart you are, but how you are smart".
Forward Focus Thinking was covered by drawing a circle, dividing in half. The left side was identified with a - and the right a +. The - is the back side which is negative words (ex. don't, can't, shouldn't, no, never, won't) and the + is the front side which is positive words (ex. will, do, excited, family, life, can, proud).
Steps in Forward Focus Thinking:
You can only focus on one thing at a time
The mind cannot avoid a don't
You move towards what you focus on
Forward Focused Questions: (Criteria for these are open ended, phrased so you have end in mind, focused on present or future (never past) (what, how, where, when)
What is the best thing that happened to me today?
How can I improve the situation?
Where are you doing?
What are the things that make me the happiest?
FACE (a praising process)
Find what is working
Acknowledge it
Celebrate it
Enjoy your victory
We went over Values vs Behaviors. We then covered the Team Vision which involves the role you choose to play.
20% are Visionaries: Leaders within the organization who see and support the vision
50% are Fence Sitters: Team members who are not fully committed to the vision
30% are Resisters: Team members within the organization who resist, criticize and undermine the vision (typically these are people who have lost their dream so they will take yours as well)
We were able to look at different types of note taking which makes me think I'm going to change up my note taking style because I like some of the other ways.
We took the Stringer or Grouper Quiz in which there is no right or wrong answer. I ended up being a Grouper which I definitely identify with after looking over the descriptions.
If you want to learn about your learning style as a grouper, click here and if you want to learn about your learning style as a stringer, click here.
I found it eye opening to say the least.
Properties of the Hair and Skin and the skeletal system of the head was over viewed. I learned that in regards to density of hair, blondes have the highest number of individual strands of hair per 1 square inch of scalp.
Blondes: 140,000 hairs
Brown: 110,000 hairs
Black: 108,000 hairs
Red: 80,000 hairs
Condition of hair and hair analysis covered:
Texture:
coarse, medium, and fine hair.
Porosity:
low, average, high
Elasticity
Density
I am still really enjoying my classes. I actually look forward to going which doesn't normally happen at the universities I've attended.
Found a diagram to illustrate the Growth Cycles of Hair:

- Plugged In
- Forward Focus
- Learning Journey
- Non-Linear Notetaking
- General Info on Hair and Cranium
We also took a Multiple Intelligence Questionnaire (micubed.com) that was able to identify your type of learning. There are 7 Intelligences that this is based off of. I found it a really interesting quiz to where you answered questions and also identified which stick figure you identified with. From the results it hit me spot on with my learning type. "It's not how smart you are, but how you are smart".
Forward Focus Thinking was covered by drawing a circle, dividing in half. The left side was identified with a - and the right a +. The - is the back side which is negative words (ex. don't, can't, shouldn't, no, never, won't) and the + is the front side which is positive words (ex. will, do, excited, family, life, can, proud).
Steps in Forward Focus Thinking:
- Recognize where you are
- Make a 10% shift
- Practice the 3 laws of the mind
- Ask Forward Focused Questions
You can only focus on one thing at a time
The mind cannot avoid a don't
You move towards what you focus on
Forward Focused Questions: (Criteria for these are open ended, phrased so you have end in mind, focused on present or future (never past) (what, how, where, when)
What is the best thing that happened to me today?
How can I improve the situation?
Where are you doing?
What are the things that make me the happiest?
FACE (a praising process)
Find what is working
Acknowledge it
Celebrate it
Enjoy your victory
We went over Values vs Behaviors. We then covered the Team Vision which involves the role you choose to play.
20% are Visionaries: Leaders within the organization who see and support the vision
50% are Fence Sitters: Team members who are not fully committed to the vision
30% are Resisters: Team members within the organization who resist, criticize and undermine the vision (typically these are people who have lost their dream so they will take yours as well)
We were able to look at different types of note taking which makes me think I'm going to change up my note taking style because I like some of the other ways.
We took the Stringer or Grouper Quiz in which there is no right or wrong answer. I ended up being a Grouper which I definitely identify with after looking over the descriptions.
- When studying one unfamiliar subject, you:
a. prefer to gather information from diverse topic areas.
b. prefer to focus on one topic. - You would rather:
a. know a little about a great many subjects
b. become an expert on just one subject - When studying from a textbook, you:
a. skip ahead and read chapters of special interest out of sequence
b. work systematically from one chapter to the next, not moving on until you have understood earlier material - When asking people for information about some subject of interest, you:
a. tend to ask broad questions that call for rather general answers
b. tend to ask narrow questions that demand specific answers - When browsing in a library or bookstore, you:
a. roam around looking at books on many different subjects
b. stay more or less in one place, looking at books on just a couple of subjects - You are best at remembering:
a. general principles
b. specific facts - When performing some tasks, you:
a. like to have background information not strictly related to the work
b. prefer to concentrate only on strictly relevant information - You think that educators should:
a. give students exposure to a wide range of subjects in college
b. ensure that students mainly acquire in-depth knowledge related to their specialties - When on vacation, you would rather:
a. spend a short amount of time in several places
b. stay in one place the whole time and get to know it well - When learning something, you would rather:
a. follow general guidelines
b. work with a detailed plan of action
If you want to learn about your learning style as a grouper, click here and if you want to learn about your learning style as a stringer, click here.
I found it eye opening to say the least.
Properties of the Hair and Skin and the skeletal system of the head was over viewed. I learned that in regards to density of hair, blondes have the highest number of individual strands of hair per 1 square inch of scalp.
Blondes: 140,000 hairs
Brown: 110,000 hairs
Black: 108,000 hairs
Red: 80,000 hairs
Condition of hair and hair analysis covered:
Texture:
coarse, medium, and fine hair.
Porosity:
low, average, high
Elasticity
Density
I am still really enjoying my classes. I actually look forward to going which doesn't normally happen at the universities I've attended.
Found a diagram to illustrate the Growth Cycles of Hair:
Tuesday, June 25, 2013
Day 1 of School Paul Mitchell (Intro night)
I started evening classes at Paul Mitchell in the Cosmetology Program!!! Woot Woot! It was a very busy evening with meeting a lot of new faces and our instructor. Our instructor has 30+ years in the business and knows her stuff. She is enthusiastic and shows that she cares about our learning experience.
Starting the program you are required to wear all black with a splash of color (one accessory: earrings, necklace, belt, scarf, etc). When I got to the building and parked in the designated area, went inside and to my classroom. At our spots were a stack of Milady's Standard Cosmetology books shrink wrapped and a Paul Mitchell messenger bag with books inside. On the desk was a clear pencil pouch with markers, a Paul Mitchell education index card and the Paul Mitchell Plugged In USB. Also there were small bowls with candy in them for us.
We started by introducing ourselves:
It wasn't a typical drag on introduction, they kept it fun and interesting to where you wanted to listen. I've noticed that the people who are in leadership positions appear to actually WANT to be there. They look as though they are enjoying their job and being apart of an educational facility.
We watched a DVD of John Paul DeJoria , Winn Claybaugh and Angus Mitchell welcoming us to the school. Our instructor gave us our Core Orientation Handbooks which were black binders. We filled out some information inside and then we toured the school.
One part we filled out in the handbook I really liked which was our Game Plan. This is where we first filled out Learning Questions we might have (ex. How am I going to remember all the different types of cuts?), then what we considered our Learning Blocks. Now with our Learning Blocks we were asked to put those on a sticky note because we would be working through those, so they wouldn't be permanent. Next we wrote our Learning Goals (ex. be a great colorist, stylist, all of it, etc). Then came our Learning Commitment of how were were going to accomplish that (ex. review everyday). Finally we concluded with our Affirmation. It had to be in the present, not I used to be or I will be.
We also filled out a Who's Who checklist to help identify each team member and how they can help you. This covered who I would talk to about attendance, tuition, grades, student programs (which I am very excited about the Design Team), my Learning Leaders, service desk, and clinic floor.
We covered important core dates and then our core worksheet which I'm trying not to find intimidating. The worksheet has 8 rows and 10 columns of different items to meet state requirements that are to be completed during core. For example in one box it has triangular graduation and in another is single drape. When performing a service later on the floor, there is the possibility that we could complete 4 boxes in one service (which makes me a little less anxious on not completing everything).
Dinner for evening classes goes from 7:30-8:00pm and we can go off campus or stay there. As part of the tour we saw our break area has microwaves, a refrigerator, pop machine, snack machine and plenty of seating.
The part I was most looking forward to.....KITMAS!!! It's where we were delivered our kits. One of the girls dressed up in a Santa Claus costume and they jiggled bells. We opened our boxes and inventoried all of our items to make sure they were there. It really did feel like an awesome Christmas to open up all the boxes and get to see all the tools I will be working with. (I will photo everything and upload pictures) The girls were a huge help in helping us put together and organize my kit. I would have be absolutely lost without them.
I am very excited for another class tonight. We were given a small amount of homework to fill out the All About Me page, register my kit and then label everything.
*****DISCLAIMER***** This is my personal experience with the Paul Mitchell school and the school you attend may do things a little different.
Starting the program you are required to wear all black with a splash of color (one accessory: earrings, necklace, belt, scarf, etc). When I got to the building and parked in the designated area, went inside and to my classroom. At our spots were a stack of Milady's Standard Cosmetology books shrink wrapped and a Paul Mitchell messenger bag with books inside. On the desk was a clear pencil pouch with markers, a Paul Mitchell education index card and the Paul Mitchell Plugged In USB. Also there were small bowls with candy in them for us.
We started by introducing ourselves:
- Name
- Where am I from?
- Why did I pick Paul Mitchell?
- Random Fact about myself.
- Where I want to go in the Industry?
It wasn't a typical drag on introduction, they kept it fun and interesting to where you wanted to listen. I've noticed that the people who are in leadership positions appear to actually WANT to be there. They look as though they are enjoying their job and being apart of an educational facility.
We watched a DVD of John Paul DeJoria , Winn Claybaugh and Angus Mitchell welcoming us to the school. Our instructor gave us our Core Orientation Handbooks which were black binders. We filled out some information inside and then we toured the school.
One part we filled out in the handbook I really liked which was our Game Plan. This is where we first filled out Learning Questions we might have (ex. How am I going to remember all the different types of cuts?), then what we considered our Learning Blocks. Now with our Learning Blocks we were asked to put those on a sticky note because we would be working through those, so they wouldn't be permanent. Next we wrote our Learning Goals (ex. be a great colorist, stylist, all of it, etc). Then came our Learning Commitment of how were were going to accomplish that (ex. review everyday). Finally we concluded with our Affirmation. It had to be in the present, not I used to be or I will be.
We also filled out a Who's Who checklist to help identify each team member and how they can help you. This covered who I would talk to about attendance, tuition, grades, student programs (which I am very excited about the Design Team), my Learning Leaders, service desk, and clinic floor.
We covered important core dates and then our core worksheet which I'm trying not to find intimidating. The worksheet has 8 rows and 10 columns of different items to meet state requirements that are to be completed during core. For example in one box it has triangular graduation and in another is single drape. When performing a service later on the floor, there is the possibility that we could complete 4 boxes in one service (which makes me a little less anxious on not completing everything).
Dinner for evening classes goes from 7:30-8:00pm and we can go off campus or stay there. As part of the tour we saw our break area has microwaves, a refrigerator, pop machine, snack machine and plenty of seating.
The part I was most looking forward to.....KITMAS!!! It's where we were delivered our kits. One of the girls dressed up in a Santa Claus costume and they jiggled bells. We opened our boxes and inventoried all of our items to make sure they were there. It really did feel like an awesome Christmas to open up all the boxes and get to see all the tools I will be working with. (I will photo everything and upload pictures) The girls were a huge help in helping us put together and organize my kit. I would have be absolutely lost without them.
I am very excited for another class tonight. We were given a small amount of homework to fill out the All About Me page, register my kit and then label everything.
*****DISCLAIMER***** This is my personal experience with the Paul Mitchell school and the school you attend may do things a little different.
Subscribe to:
Posts (Atom)