So we did a big review day of everything we had learned about color.
I realized a better was to describe Tertiary colors are to mix a primary and secondary color. I still look at which primary color it is closer to so I know which primary I should add 2 of. I am more of a visual and interactive learner.
Tonight we will be going over color map formulations more in depth and working with color swatches. I'm excited because I LOVE color.
Tuesday, July 16, 2013
Sunday, July 14, 2013
Paul Mitchell KITMAS
Ok so I promised these pictures awhile back so here they are: (the 3 Milady books are not shown below because I leave them in my locker so I don't have to lug them around)


Day 10 Paul Mitchell (Color Wheel, ABCDs of Color, color map formulations)
For us this ended up being our Bring a Friend day. YEA!!!
Agenda:
PlayDoh colorwheel
ABCDs of Color
Color Map Formulations
True Law: Without light there is no color
Metamerism: The Play on Light
Have you ever noticed when you go different places your hair or makeup looks different? Well that can be due to the lighting.
Incandescent Light: warm tones
Fluorescent Light: cool tones
Best and most accurate light: sun, natural light
PLAYDOH COLORWHEEL:
We were given a blank colorwheel that we filled in with playdoh. Loved it!
Primary Colors
Red, Yellow, Blue
Secondary Colors
1/2 and 1/2 of 2 primary colors (1/2 blue and 1/2 red make purple, 1/2 yellow and 1/2 red make orange, 1/2 yellow and 1/2 blue make green)
Tertiary Colors
1/3 and 2/3 of 2 primary colors (mix 3 even sized playdoh balls together, 2 being one primary color and 1 being another primary color)
Let me say that doing it this way made SOOO much more sense to me than when I've been handed a colorwheel before.
Here is mine:

Sorry for the white pieces on some of the color patches, it stuck to one of my notebook pages.
The 4 extra patches by violet (I was told not to call it purple because people do not want to hear you are putting purple in their hair, violet sounds better), are adding more white each time and see how it lightens.
With Brown
to get golden you add yellow
to get warm you add red
to get ash you add small amount of blue (blue is very potent in coloring)
ABCD's of Color:
Ammonia: volatile, inorganic substance (STRONG ODOR), used to open cuticle
Base: Viscous product that binds, holds everything together
Color Pigment: 1. Oxidative 2. Direct
Developer (or H2O2): Energy, create lift or deposit, energy releases more or less oxygen, decolorize melanin
Lift: taking color out
Deposit: putting color in
Color Map Formulation:
We went over the formulations steps, gray coverage, formulating with the Paul Mitchell the color map and processing color. I am excited to get into coloring!
Day 9 Paul Mitchell (guest service, character awards, review)
Agenda:
It is extremely important to remember wherever you are working you are not only representing yourself but your employers when you help others.
GUEST SERVICE:
Going over guest service we covered everything from what we do when the guest arrives, hair history, to recommending product for their hair.
I learned that we have to get 3 signatures from one of our instructors before our service is completely finished. I actually like that so I will be getting feedback and education throughout being out on the floor later.
We covered the 10 Opportunities and 2 minute plan. Also the Check Five and 4-Step Program.
The Check Five was my favorite part because it leads to success for you if you follow it.
Check Five:
Hearing
is what I'm saying professional and appropriate?
Sight
am I in dress code? Is my area clean and neat?
Touch
is my guest comfortable?
Smell
Light perfume, deodorant
Taste
can I taste my lunch? MINTS!!!
Character Awards:
We each drew a name of another person in our program to which we would be presenting an award to. This is not to be about skill or talent, but all about their character and personality. I am going to keep thinking of what I can do for the person I drew.
We ended class by reviewing the concepts we've learned thus far.
- Guest Service
- Character Awards
- Review Culture and Wet Styling
It is extremely important to remember wherever you are working you are not only representing yourself but your employers when you help others.
GUEST SERVICE:
Going over guest service we covered everything from what we do when the guest arrives, hair history, to recommending product for their hair.
I learned that we have to get 3 signatures from one of our instructors before our service is completely finished. I actually like that so I will be getting feedback and education throughout being out on the floor later.
We covered the 10 Opportunities and 2 minute plan. Also the Check Five and 4-Step Program.
The Check Five was my favorite part because it leads to success for you if you follow it.
Check Five:
Hearing
is what I'm saying professional and appropriate?
Sight
am I in dress code? Is my area clean and neat?
Touch
is my guest comfortable?
Smell
Light perfume, deodorant
Taste
can I taste my lunch? MINTS!!!
Character Awards:
We each drew a name of another person in our program to which we would be presenting an award to. This is not to be about skill or talent, but all about their character and personality. I am going to keep thinking of what I can do for the person I drew.
We ended class by reviewing the concepts we've learned thus far.
Day 8 Paul Mitchell (backcombing, hair structure, look book)
Sorry I know I am behind on my postings. It has been a little crazy around here.
Agenda:

 She's gorgeous eh? hehe. Well I liked backcombing and found it fun. The hard part for me was then deciding on the style. I tried this but it didn't turn out like I wanted:


I had seen this style on Pinterest here:

As you can see, I need to work on it.
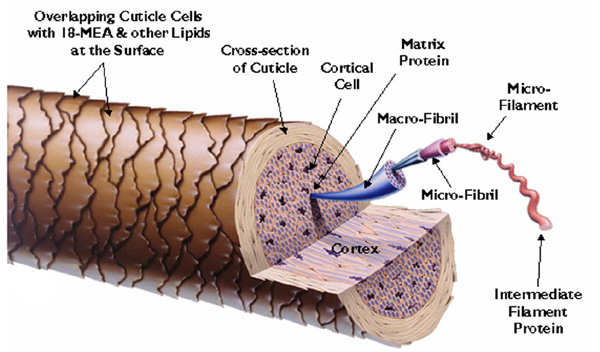
Hairstructure:
Our instructor gave us some hand outs of hair structure diagram to where it broke the hair shaft down.
Your hair has 3 main parts; the cuticle, the cortex and the medulla.
Something I found very interesting is that even though the cuticle is the outermost layer of the hair, it's the cortex where you find your hair color.
Our instructor did a small interactive presentation to where she would use serane wrap around our arm (we would take turns so she just wrapped one arm for each demonstration) to simulate the cuticle.

For fine hair, she would wrap our arm 4 times.
For medium hair' she would wrap our arm 7 times and then add on to make it 12 layers.
For thick hair, she would wrap our arm 18 times.
After each wrapping, it would be slid off the arm so we could feel the thickness. Since I'm a hands-on person it really helped cement what the cuticle was like.
Chemical Makeup of Hair:
Proteins: 65-95% Amino Acids
Water: up to 32% moisture
Carbs: flexibility
Lipids: defense, shine
Pigment: color makes up only 1%
Minerals: strength
Found this diagram that is similar to the one we received to fill out:
LOOK BOOK:
Agenda:
- Backcombing
- Hairstructure
- Look Book


I had seen this style on Pinterest here:
As you can see, I need to work on it.
Hairstructure:
Our instructor gave us some hand outs of hair structure diagram to where it broke the hair shaft down.
Your hair has 3 main parts; the cuticle, the cortex and the medulla.
Something I found very interesting is that even though the cuticle is the outermost layer of the hair, it's the cortex where you find your hair color.
Our instructor did a small interactive presentation to where she would use serane wrap around our arm (we would take turns so she just wrapped one arm for each demonstration) to simulate the cuticle.
For fine hair, she would wrap our arm 4 times.
For medium hair' she would wrap our arm 7 times and then add on to make it 12 layers.
For thick hair, she would wrap our arm 18 times.
After each wrapping, it would be slid off the arm so we could feel the thickness. Since I'm a hands-on person it really helped cement what the cuticle was like.
Chemical Makeup of Hair:
Proteins: 65-95% Amino Acids
Water: up to 32% moisture
Carbs: flexibility
Lipids: defense, shine
Pigment: color makes up only 1%
Minerals: strength
Found this diagram that is similar to the one we received to fill out:
LOOK BOOK:
We were instructed that we would be making a Look Book as we are going through school. This will illustrate what we can do, would like to do, or possibilities. That way when we graduate and look for a job, we can show them this book so they can see what we are capable of. I really like the idea.
Wednesday, July 10, 2013
Day 7 Paul Mitchell (roller placement)
ROLLER PLACEMENT
This is a lot like doing pincurls in regards to base, stem and curl/circle. The advantage to doing rollers over pin curls are:
Volume-base curls
Your base: (can be shaped in rectangle, square, or triangle)
should be same width and length of roller
Stem:
part of hair that starts to come up over the roller from the scalp
Curl or circle:
the roller determines size of wave or curl
We were also instructed on the various degrees in which to pull the hair to create more volume if desired. For instance if you were curling the hair forward you would comb the hair back at a 45 degree angle and pin on base.
SECTIONING
Our instructor taught us how to section off the hair and do little top knots (she had another name for them but I cannot remember).


There end up being a total of 9 sections: 3 down the middle and 3 on each side.
From there we rolled the front middle (above forehead) section on back (like a mohawk). We then rolled the side middle, then the bottom portion and finished with the front section by the face.


We get to unroll them tomorrow to see how they turned out. I am excited!
This is a lot like doing pincurls in regards to base, stem and curl/circle. The advantage to doing rollers over pin curls are:
- Ability to use more hair (faster than pin curling)
- Can create more tension (tighter curls)
- Variety (shapes, sizes, texture of roller- basically anything you can wrap your hair around)
Volume-base curls
- on base
- used to get lift/volume
- bring curl farther back on base when placing (slightly overdirected)
- on base
- good for volume but not as high as volume-base curls
- good for cow-licks or growth patterns
- stem is half on
- not as much volume
- produces flat then curl look
- medium volume
- great on longer hair
- curl is off base
- produces curl at ends look
Your base: (can be shaped in rectangle, square, or triangle)
should be same width and length of roller
Stem:
part of hair that starts to come up over the roller from the scalp
Curl or circle:
the roller determines size of wave or curl
We were also instructed on the various degrees in which to pull the hair to create more volume if desired. For instance if you were curling the hair forward you would comb the hair back at a 45 degree angle and pin on base.
SECTIONING
Our instructor taught us how to section off the hair and do little top knots (she had another name for them but I cannot remember).


There end up being a total of 9 sections: 3 down the middle and 3 on each side.
From there we rolled the front middle (above forehead) section on back (like a mohawk). We then rolled the side middle, then the bottom portion and finished with the front section by the face.


We get to unroll them tomorrow to see how they turned out. I am excited!
Tuesday, July 9, 2013
Day 6 Shot in the Arm
So last evening at school we did "Shot in the arm". I have been sworn to secrecy and do not want to ruin this occasion for any future students. Just know this does not involve needles or getting hit. I do want to say that so that you're not scared.
It was a fun learning experience. Tonight I am to bring my doll head and kit so I'm excited as to what we are going to be learning. I really did miss being at school and writing these recaps.
It was a fun learning experience. Tonight I am to bring my doll head and kit so I'm excited as to what we are going to be learning. I really did miss being at school and writing these recaps.
Tuesday, July 2, 2013
1970s-Inspired Voluminous, Textured Cut from Alfaparf
Got this tutorial from Behind the Chair:

Sectioning - Figure 1
Divide the hair into two symmetrical diagonal sections from the
temples to the neck. (Panels A, B, D-see next step)
Divide panel B into 2 symmetrical triangles. (C panels)

Sectioning - Figure 2
Divide the hair into two symmetrical diagonal sections from the
temples to the neck. (Panels A, B, D)
Divide panel B into 2 symmetrical triangles. (C panels)

Cutting Step 1
Divide panel A into horizontal sections that run parallel to the shoulders. Bring all of the hair into the first section, which serves as the guideline

Cutting Step 2
Divide panel B into diagonal sections that are parallel to each other. Bring all of the hair to the first guide section.


Cutting Step 3
Panel A: Take a vertical section from the center of the panel and raise it so that your fingers are parallel to the round part of the head. Use the center section as a guideline. Layer all the sections over the guideline section.

Cutting Step 4
Panel B: Using the crown of the head as the guiding section, trace parallel and diagonal sections, creating a gradually increasing separation from panel A.
Cutting Step 5
Panel C: Create a vertical, graduated cut by layering all the sections over the previous ones to create more volumes in the side panels. Panel C is totally separate from and shorter than the rest of the cut.

Cutting Step 6 - A
Panel D: Using the central line of the bangs as a guide, divide panel D into internal diagonal sections. Layer all the sections over the guide to create rounded bangs.

Cutting Step 6 - B
Finally, make sure the edges are even.

Styling Look 1
Dry and style with SDL Diamante Illuminating Polish and SDL Diamante Illuminating Mega Hairspray for a more polished look.

Styling Look 2
Alternatively, break up curls to create more volumes using SDL Diamante Illuminating Mega Hairspray.

Sectioning - Figure 1
Divide the hair into two symmetrical diagonal sections from the
temples to the neck. (Panels A, B, D-see next step)
Divide panel B into 2 symmetrical triangles. (C panels)
Sectioning - Figure 2
Divide the hair into two symmetrical diagonal sections from the
temples to the neck. (Panels A, B, D)
Divide panel B into 2 symmetrical triangles. (C panels)
Cutting Step 1
Divide panel A into horizontal sections that run parallel to the shoulders. Bring all of the hair into the first section, which serves as the guideline
Cutting Step 2
Divide panel B into diagonal sections that are parallel to each other. Bring all of the hair to the first guide section.
Cutting Step 3
Panel A: Take a vertical section from the center of the panel and raise it so that your fingers are parallel to the round part of the head. Use the center section as a guideline. Layer all the sections over the guideline section.
Cutting Step 4
Panel B: Using the crown of the head as the guiding section, trace parallel and diagonal sections, creating a gradually increasing separation from panel A.
Cutting Step 5
Panel C: Create a vertical, graduated cut by layering all the sections over the previous ones to create more volumes in the side panels. Panel C is totally separate from and shorter than the rest of the cut.
Cutting Step 6 - A
Panel D: Using the central line of the bangs as a guide, divide panel D into internal diagonal sections. Layer all the sections over the guide to create rounded bangs.
Cutting Step 6 - B
Finally, make sure the edges are even.
Styling Look 1
Dry and style with SDL Diamante Illuminating Polish and SDL Diamante Illuminating Mega Hairspray for a more polished look.
Styling Look 2
Alternatively, break up curls to create more volumes using SDL Diamante Illuminating Mega Hairspray.
Roped Fishtail
Found these step by step instructions at behind the chair for a Roped Fishtail.

Step 1
Prep the damp hair with Invisible Control and Model Behavior. Combining these products will create smooth and soft texture with a bit of grit, for an ideal combination to prep hair for a braid that looks effortlessly flawless.
Step 2
Dry the hair. This allows the Invisible Control to work with the natural texture of the hair creating lived-in volume and texture.
Step 3
Give the hair a deep side parting by loosely moving it over to one side, using your fingers.

Step 4
In the top section, braid the hair in a three strand French style just to the top of the ear.

Step 5
At the top of the ear, transition into a fishtail braid by combining the three strands into one and pulling the other side over.

Step 6
Take the two large sections and continue pulling small pieces of hair from the underside of one section and incorporate into the other, alternating as you go.

Saturday, June 29, 2013
No School Paul Mitchell

I will not be doing posts on my Paul Mitchell experience in school this next week due to being on break. I know it's sad that we just started and have only been there a week to now have a break. I am looking forward to reading our book we have by Winn Claybough, "Be Nice (Or Else)".
Also I will be working in our Paul Mitchell Product Guide Workbook. This next week I will post the pictures of everything we received in our kit.
Day 5 Paul Mitchell (take home team, Pin curls, fingerwaves)
Take Home Team
Pin curls with hands on
Fingerwaves with hands on
Last night the "Take-Home" Team came in and talked to us. They talked to use about the Paul Mitchell products and had us smell each one. Most all of them have a nice smell to them which is a bonus. We watched a video clip on what diversion is and what we can do to help. I looked up on Google and Youtube to try to find the clip but I was unable to. It was about diversion on Fox 8 news with Steve Noviello about professional haircare products on the shelves at places like Target, CVS, etc. They bought some Paul Mitchell products from these stores and then had the official Paul Mitchell products. Fox 8 news took the products to a lab and had them tested. The person who performed the test put 1 of each in a petri dish. The official Paul Mitchell product grew zero colonies of bacteria whereas the Paul Mitchell product bought at the store grew numerous colonies of bacteria. In the clip they even compared shelf bought Paul Mitchell to that of sewage. The bottles look almost identical but 2 ways you can tell the Paul Mitchell on the shelves is counterfeit is the cap. On official Paul Mitchell bottles there is a single snap whereas on counterfeits there are 2 snaps. Also if you compare the bottoms, real Paul Mitchell bottles are seamless, the counterfeits have a seam that you can see and can sometimes bow the bottom of the bottle.
With price it is generally more expensive to buy from non-salon stores versus salons. Paul Mitchell even said in the clip that he could sell to regular stores and make a lot of money if he wanted to but that goes against his principles. Buying from a salon you know you are getting the real product, not some counterfeit, diluted, old, or fake product. So if you have bought salon products from off regular store shelves and they really haven't worked, you should try getting that same product from an actual salon and see if there is a difference.
Pincurls:
These were actually fun to learn. You want to do these on wet hair so they can dry in the curl.
We learned about the base, the stem and the circle of pin curls.
We were also taught the foundations and bases and where to use each.
- Rectangle
- Triangle
- Ark or Half Moon
- Square
- No stem (or on-base)
- Half-stem
- Full stem


I will say the front row we forgot to add product which you can see fell over more than the ones farther back but that could also be because of the weight of the hair and the size of the curls.
FINGERWAVES:
These are the bane of my existence. I am going to continue to practice this and hope I get the knack of it.
Need a fair amount of product. We used Paul Mitchell's Hair Sculpting Lotion and Foaming Palmade.
#1 THINK
- How do I want them to look when I'm done?
- How am I going to get them to look like that?
- What tool am I going to use?
- On the Heavy side of the Part
- Going forward from the Hairline to the Apex
- ALL THE WAY AROUND THE HEAD
Slightly moving comb in direction needed
Clamp ridge between fingers
Comb down below fingers
I did not take a picture of my fingerwaves because I did not like the look of it at all! Below is a picture I found to illustrate what good fingerwaves look like, that I hope one day to replicate.

That was our evening. Also let me say it is difficult to wash hair on a head that doesn't have a body attached, haha.
Subscribe to:
Posts (Atom)